Vue의 가장 강력한 무기 중 하나는 일반 HTML을 프로그래밍적으로 제어할 수 있게 해주는 디렉티브(Directive)입니다.
디렉티브는 모두 v- 접두사로 시작하며, DOM 요소에게 무언가를 지시(Direct)하는 특수한 속성입니다.
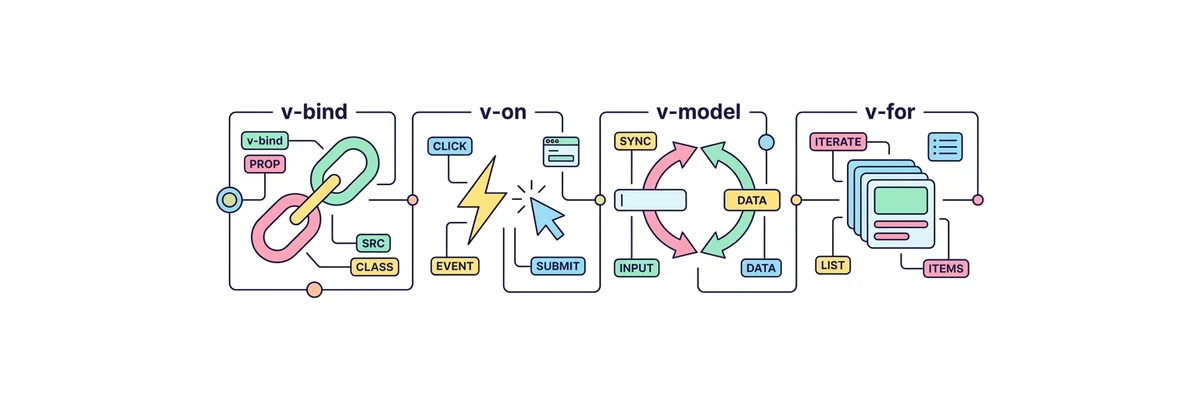
이 중 실무에서 숨 쉬듯이 사용되는 필수 4대장(v-bind, v-on, v-model, v-for)만 완벽히 마스터하면 어떠한 UI든 손쉽게 구현할 수 있습니다.
디렉티브
단축어
역할 및 설명
v-bind
: (콜론)
HTML 속성(class, src, href, disabled 등)에 JS 변수를 단방향 연결합니다.
v-on
@ (골뱅이)
사용자 이벤트(click, keyup, submit 등)를 감지하고 함수를 실행합니다.
v-model
단축어 없음
input, select 등의 폼 요소와 변수를 양방향으로 동기화합니다. (실시간 연결)
v-for
단축어 없음
배열(Array) 데이터를 기반으로 요소를 반복 렌더링합니다. (:key 필수)
v-if / v-show
단축어 없음
조건이 참(true)일 때만 요소를 화면에 보여줍니다.
TodoList.vue
<!-- ========================================== -->
<!-- 📂 TodoList.vue (필수 디렉티브 4종 세트 실전 예제) -->
<!-- ========================================== -->

<script setup>
import { ref, computed } from 'vue';

// 입력창과 연결할 변수 (v-model 전용)
const newTodo = ref('');

// 할 일 목록 배열 (v-for 전용)
const todos = ref([
  { id: 1, text: 'Vue 3 문법 복습하기', done: false },
  { id: 2, text: '운동 다녀오기', done: true }
]);

// 아직 안 끝난(done이 false인) 할 일의 개수를 계산
const activeCount = computed(() => todos.value.filter(t => !t.done).length);

// 할 일 추가 함수 (v-on 전용)
const addTodo = () => {
  if (newTodo.value.trim() === '') return;

  todos.value.push({
    id: Date.now(), // 고유 식별자로 타임스탬프 사용
    text: newTodo.value,
    done: false
  });

  newTodo.value = ''; // 입력창 초기화
};

// 삭제 함수
const removeTodo = (id) => {
  todos.value = todos.value.filter(t => t.id !== id);
};
</script>

<template>
  <div class="todo-container">
    <header class="todo-header">
      <h2>오늘의 할 일</h2>

      <!-- 🧩 [v-if / v-else]: 조건에 따라 다른 요소를 보여줍니다. -->
      <span v-if="activeCount > 0" class="badge badge-danger">{{ activeCount }}개 남음</span>
      <span v-else class="badge badge-success">모두 완료! 🎉</span>
    </header>

    <div class="input-group">
      <!-- 🧩 [v-model]: 입력창과 변수 'newTodo'를 하나로 묶어버림 (양방향 연결) -->
      <!-- 🧩 [v-on 또는 @]: @keyup.enter 로 엔터키를 쳤을 때 addTodo 실행 -->
      <input
        v-model="newTodo"
        @keyup.enter="addTodo"
        placeholder="할 일을 입력하고 엔터를 치세요!"
        class="todo-input"
      />

      <!-- 🧩 [v-bind 또는 :]: 버튼의 disabled 속성을 동적으로 조작 -->
      <!-- 값이 비어있으면(:disabled="true"가 됨) 버튼 클릭 불가 -->
      <button
        @click="addTodo"
        :disabled="newTodo.trim() === ''"
        class="add-btn"
      >
        추가
      </button>
    </div>

    <ul class="todo-list">
      <!-- 🧩 [v-for]: todos 배열을 돌면서 li 태그를 여러 개 찍어냅니다. -->
      <!-- 주의: v-for를 쓸 때는 반드시 고유한 :key 값을 부여해야 합니다! -->
      <li
        v-for="todo in todos"
        :key="todo.id"
        class="todo-item"
        :class="{ 'is-done': todo.done }"
      >
        <label class="checkbox-label">
          <!-- 이 체크박스도 내부적으로 todo 객체의 done 값과 양방향 연결됩니다 -->
          <input type="checkbox" v-model="todo.done" />
          <span class="todo-text">{{ todo.text }}</span>
        </label>

        <!-- 삭제 버튼에 클릭 이벤트 연결, 클릭 시 id를 넘깁니다. -->
        <button @click="removeTodo(todo.id)" class="delete-btn">🗑️</button>
      </li>
    </ul>

    <p v-if="todos.length === 0" class="empty-msg">
      할 일이 없습니다. 휴식을 취하세요!
    </p>
  </div>
</template>

<style scoped>
/* 핵심 스타일만 간단히 작성 */
.todo-container { padding: 2rem; max-width: 500px; margin: 2rem auto; border: 1px solid #e2e8f0; border-radius: 16px; box-shadow: 0 10px 25px -5px rgba(0,0,0,0.1); background: white; }
.todo-header { display: flex; justify-content: space-between; align-items: center; margin-bottom: 1.5rem; }
.badge { padding: 0.25rem 0.75rem; border-radius: 9999px; font-size: 0.85rem; color: white; }
.badge-danger { background: #ef4444; }
.badge-success { background: #10b981; }
.input-group { display: flex; gap: 0.5rem; margin-bottom: 2rem; }
.todo-input { flex: 1; padding: 0.75rem 1rem; border: 2px solid #e2e8f0; border-radius: 8px; }
.add-btn { padding: 0.75rem 1.5rem; background: #3b82f6; color: white; border: none; border-radius: 8px; font-weight: bold; cursor: pointer; }
.add-btn:disabled { opacity: 0.5; cursor: not-allowed; }
.todo-list { list-style: none; padding: 0; }
.todo-item { display: flex; justify-content: space-between; align-items: center; padding: 1rem; margin-bottom: 0.5rem; border: 1px solid #f1f5f9; border-radius: 8px; background: #f8fafc; transition: all 0.2s; }
.todo-item.is-done { opacity: 0.6; }
.todo-item.is-done .todo-text { text-decoration: line-through; color: #94a3b8; font-weight: normal; }
.checkbox-label { display: flex; align-items: center; gap: 1rem; cursor: pointer; flex: 1; }
.todo-text { font-weight: 600; color: #334155; }
.delete-btn { background: transparent; border: none; font-size: 1.2rem; cursor: pointer; padding: 0.25rem; border-radius: 4px; }
.delete-btn:hover { background: #fee2e2; }
.empty-msg { text-align: center; color: #94a3b8; font-style: italic; margin-top: 2rem; }
</style>