Vue 3 소개와 Composition API의 혁신
Vue 3와 Composition API의 혁신
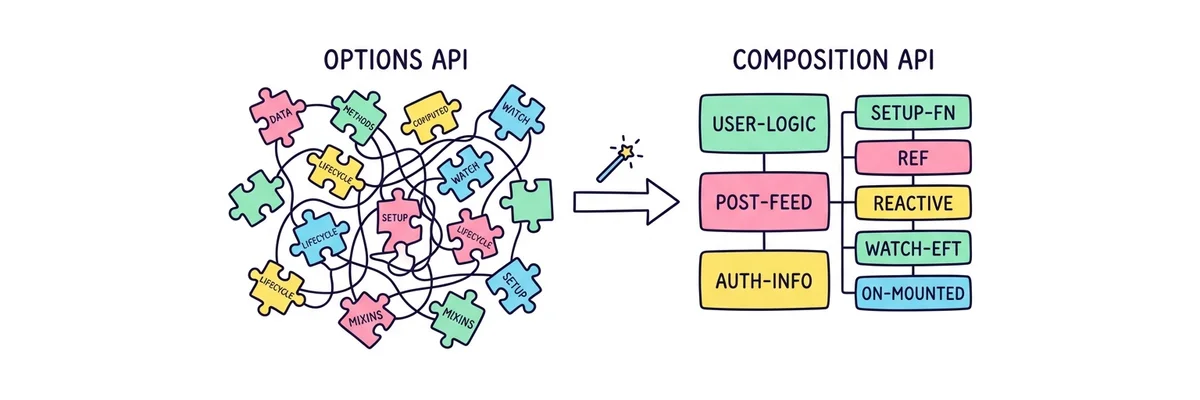
과거 Vue 2의 Options API는 배우기 쉽다는 장점이 있었지만, 앱이 커지면 하나의 기능에 대한 코드가 data, methods, computed 등 여러 곳에 흩어져 코드를 추적하고 유지보수하기가 매우 힘들었습니다. 이를 해결하기 위해 등장한 Vue 3의 Composition API (<script setup>)는 연관된 기능 코드를 한데 묶어서 작성할 수 있도록 해주는 혁명적인 패러다임 전환입니다.
<script setup>의 마법
- 코드의 극적인 간소화: 귀찮은
export default { setup() { ... return {} } }껍데기가 몽땅 사라졌습니다. 변수나 함수를 선언하기만 하면 템플릿에서 즉시 사용 가능합니다. - React Hooks와 유사한 구조: 상태 선언, 이벤트 처리 로직이 위에서 아래로 물 흐르듯 자연스럽게 작성되어 가독성이 폭발적으로 상승합니다.
- 타입스크립트(TS) 완벽 호환: Vue 2의 최대 단점이었던 조악한 TS 지원이 해결되었고, 네이티브 수준의 완벽한 타입 추론을 제공합니다.
<!-- HIDDEN_TAB -->
<div id="app"></div>
<script src="https://unpkg.com/vue@3/dist/vue.global.js"></script>
<script>
  const { createApp, ref } = Vue;
  createApp({
    setup() {
      const count = ref(0);
      const increment = () => {
        count.value += 1;
      };
      return { count, increment };
    },
    template: `
      <div style="padding: 2rem; max-width: 400px; margin: 2rem auto; text-align: center; border: 1px solid #e2e8f0; border-radius: 12px; box-shadow: 0 10px 15px -3px rgba(0,0,0,0.1); background: white;">
        <h1 style="font-size: 1.5rem; font-weight: bold; margin-bottom: 1.5rem; color: #1e293b;">Vue 3 시작하기 🚀</h1>
        <p style="font-size: 3.75rem; font-weight: 900; color: #10b981; margin: 0 0 1.5rem 0;">{{ count }}</p>
        <button @click="increment" style="padding: 0.75rem 2rem; background: #10b981; color: white; border: none; border-radius: 9999px; font-size: 1rem; font-weight: bold; cursor: pointer; transition: background 0.2s;" onmouseover="this.style.background='#059669'" onmouseout="this.style.background='#10b981'">
          +1 증가시키기
        </button>
      </div>
    `
  }).mount('#app');
</script>
반응형 상태 관리 (ref vs reactive)
반응형 상태의 두 기둥: ref와 reactive
Vue 3에서 변수 값이 변경될 때 화면이 자동으로 갱신(반응형, Reactivity)되게 하려면 ref 또는 reactive를 사용해야 합니다.
둘은 역할이 비슷해 보이지만 담을 수 있는 데이터 타입과 접근 방식(.value의 유무)에서 치명적인 차이를 가집니다. 실무에서는 보통 원시값과 객체를 모두 아우를 수 있는 ref를 만능 상자처럼 더 선호하는 경향이 있습니다.

| 특징 | ref() (추천) | reactive() |
|---|---|---|
| 허용 타입 | 원시값(String, Number), 객체, 배열 등 모든 타입 | 오직 객체(Object), 배열, Map, Set만 가능 |
| 스크립트 접근 | 반드시 .value를 붙여야 함 (예: count.value) |
.value 없이 프로퍼티에 직접 접근 (예: user.name) |
| 재할당 안정성 | 전체 객체를 통째로 바꿔치기(재할당) 해도 반응성 유지됨 | 객체를 통째로 교체하면 반응성이 끊어짐 (치명적 단점) |
💡 초보자를 위한 실전 요약: 언제 뭘 써야 할지 헷갈리신다구요? 무조건
ref()만 쓰시면 됩니다! Vue 공식 문서에서도 초보자에게는 모든 데이터 타입에 일관성 있게 사용할 수 있는 ref의 사용을 강력히 권장하고 있습니다.
<!-- HIDDEN_TAB -->
<div id="app"></div>
<script src="https://unpkg.com/vue@3/dist/vue.global.js"></script>
<script>
  const { createApp, ref, reactive } = Vue;
  createApp({
    setup() {
      // ref 테스트
      const message = ref('안녕하세요!');
      const counter = ref(0);

      const updateRef = () => {
        message.value = '반갑습니다! (ref)';
        counter.value++;
        console.log('✅ ref 업데이트됨:', message.value, counter.value);
      };

      // reactive 테스트
      let user = reactive({
        name: '김민수',
        age: 20
      });

      const updateReactive = () => {
        user.age++;
        console.log('✅ reactive 업데이트됨:', user.age);
      };

      const breakReactive = () => {
        // 🚨 반응성이 끊어지는 끔찍한 실수!
        console.warn('🚨 경고: user 객체를 통째로 교체합니다. 이제 반응성이 끊어집니다!');
        user = { name: '이영희', age: 30 };
        // 값은 바뀌었지만 Vue가 추적하지 못해 화면은 갱신되지 않음.
        console.error('현재 user.name:', user.name, '(화면은 안 바뀜!)');
      };

      return { message, counter, updateRef, user, updateReactive, breakReactive };
    },
    template: `
      <div style="display:flex; gap:2rem; max-width: 800px; margin: 2rem auto;">
        <!-- ref 영역 -->
        <div style="flex: 1; padding: 2rem; border: 2px solid #3b82f6; border-radius: 12px; background: #eff6ff;">
          <h2 style="color: #1d4ed8; font-size: 1.25rem; font-weight: 800; margin-bottom: 1rem;">ref()</h2>
          <p style="font-size: 1.1rem; color: #334155; margin-bottom: 0.5rem;">메시지: <strong>{{ message }}</strong></p>
          <p style="font-size: 2.5rem; font-weight: 900; color: #2563eb; margin: 0 0 1.5rem 0;">{{ counter }}</p>
          <button @click="updateRef" style="padding: 0.75rem 1.5rem; background: #3b82f6; color: white; border: none; border-radius: 8px; font-weight: bold; cursor: pointer; width: 100%;">ref 업데이트</button>
        </div>

        <!-- reactive 영역 -->
        <div style="flex: 1; padding: 2rem; border: 2px solid #ec4899; border-radius: 12px; background: #fdf2f8;">
          <h2 style="color: #be185d; font-size: 1.25rem; font-weight: 800; margin-bottom: 1rem;">reactive()</h2>
          <p style="font-size: 1.1rem; color: #334155; margin-bottom: 0.5rem;">이름: <strong>{{ user.name }}</strong></p>
          <p style="font-size: 2.5rem; font-weight: 900; color: #db2777; margin: 0 0 1.5rem 0;">{{ user.age }}세</p>
          <button @click="updateReactive" style="padding: 0.75rem 1.5rem; background: #ec4899; color: white; border: none; border-radius: 8px; font-weight: bold; cursor: pointer; width: 100%; margin-bottom: 0.5rem;">나이 먹기 (+1)</button>
          <button @click="breakReactive" style="padding: 0.75rem 1.5rem; background: #475569; color: white; border: none; border-radius: 8px; font-weight: bold; cursor: pointer; width: 100%;">🚨 객체 통째 교체 (반응성 파괴)</button>
        </div>
      </div>
    `
  }).mount('#app');
</script>
템플릿 문법과 필수 디렉티브
템플릿 문법과 핵심 디렉티브 (Directives)
Vue의 가장 강력한 무기 중 하나는 일반 HTML을 프로그래밍적으로 제어할 수 있게 해주는 디렉티브(Directive)입니다.
디렉티브는 모두 v- 접두사로 시작하며, DOM 요소에게 무언가를 지시(Direct)하는 특수한 속성입니다.
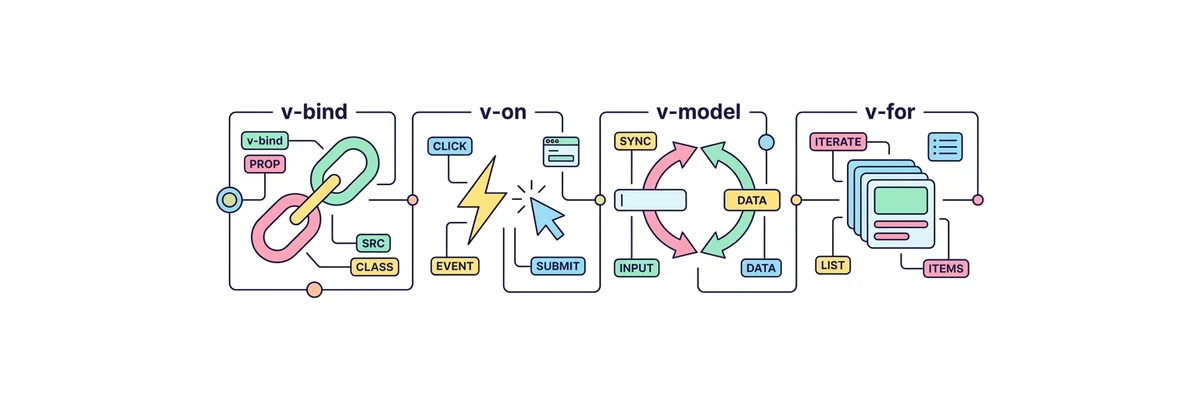
이 중 실무에서 숨 쉬듯이 사용되는 필수 4대장(v-bind, v-on, v-model, v-for)만 완벽히 마스터하면 어떠한 UI든 손쉽게 구현할 수 있습니다.
| 디렉티브 | 단축어 | 역할 및 설명 |
|---|---|---|
| v-bind | : (콜론) |
HTML 속성(class, src, href, disabled 등)에 JS 변수를 단방향 연결합니다. |
| v-on | @ (골뱅이) |
사용자 이벤트(click, keyup, submit 등)를 감지하고 함수를 실행합니다. |
| v-model | 단축어 없음 | input, select 등의 폼 요소와 변수를 양방향으로 동기화합니다. (실시간 연결) |
| v-for | 단축어 없음 | 배열(Array) 데이터를 기반으로 요소를 반복 렌더링합니다. (:key 필수) |
| v-if / v-show | 단축어 없음 | 조건이 참(true)일 때만 요소를 화면에 보여줍니다. |
<!-- HIDDEN_TAB -->
<div id="app"></div>
<script src="https://unpkg.com/vue@3/dist/vue.global.js"></script>
<script>
  const { createApp, ref, computed } = Vue;
  createApp({
    setup() {
      const newTodo = ref('');
      const todos = ref([
        { id: 1, text: 'Vue 3 디렉티브 복습하기', done: false },
        { id: 2, text: '커피 마시고 오기', done: true }
      ]);
      const addTodo = () => {
        if (newTodo.value.trim() === '') return;
        todos.value.push({ id: Date.now(), text: newTodo.value, done: false });
        newTodo.value = '';
      };
      const removeTodo = (id) => {
        todos.value = todos.value.filter(t => t.id !== id);
      };
      const activeCount = computed(() => todos.value.filter(t => !t.done).length);
      return { newTodo, todos, addTodo, removeTodo, activeCount };
    },
    template: `
      <div style="padding: 2rem; max-width: 500px; margin: 2rem auto; border: 1px solid #e2e8f0; border-radius: 16px; box-shadow: 0 10px 25px -5px rgba(0,0,0,0.1); background: white; font-family: system-ui, sans-serif;">
        <h2 style="font-size: 1.5rem; font-weight: 800; margin-bottom: 1.5rem; color: #1e293b; display: flex; justify-content: space-between; align-items: center;">
          오늘의 할 일
          <span v-if="activeCount > 0" style="font-size: 0.85rem; padding: 0.25rem 0.75rem; background: #ef4444; color: white; border-radius: 9999px;">{{ activeCount }}개 남음</span>
          <span v-else style="font-size: 0.85rem; padding: 0.25rem 0.75rem; background: #10b981; color: white; border-radius: 9999px;">모두 완료! 🎉</span>
        </h2>

        <div style="display: flex; gap: 0.5rem; margin-bottom: 2rem;">
          <input
            v-model="newTodo"
            @keyup.enter="addTodo"
            placeholder="할 일을 입력하고 엔터를 치세요!"
            style="flex: 1; padding: 0.75rem 1rem; border: 2px solid #e2e8f0; border-radius: 8px; font-size: 1rem; outline: none; transition: border-color 0.2s;"
            onfocus="this.style.borderColor='#3b82f6'" onblur="this.style.borderColor='#e2e8f0'"
          />
          <button
            @click="addTodo"
            :disabled="newTodo.trim() === ''"
            style="padding: 0.75rem 1.5rem; background: #3b82f6; color: white; border: none; border-radius: 8px; font-weight: bold; cursor: pointer; transition: all 0.2s; opacity: 1;"
            :style="{ opacity: newTodo.trim() === '' ? 0.5 : 1, cursor: newTodo.trim() === '' ? 'not-allowed' : 'pointer' }"
          >
            추가
          </button>
        </div>

        <ul style="list-style: none; padding: 0; margin: 0;">
          <li
            v-for="todo in todos"
            :key="todo.id"
            style="display: flex; align-items: center; justify-content: space-between; padding: 1rem; margin-bottom: 0.5rem; border: 1px solid #f1f5f9; border-radius: 8px; background: #f8fafc; transition: all 0.2s;"
            :style="{ opacity: todo.done ? 0.6 : 1, backgroundColor: todo.done ? '#f1f5f9' : '#f8fafc' }"
          >
            <label style="display: flex; align-items: center; gap: 1rem; cursor: pointer; flex: 1;">
              <input type="checkbox" v-model="todo.done" style="width: 1.2rem; height: 1.2rem; cursor: pointer;" />
              <span :style="{ textDecoration: todo.done ? 'line-through' : 'none', color: todo.done ? '#94a3b8' : '#334155', fontWeight: todo.done ? 'normal' : '600' }">
                {{ todo.text }}
              </span>
            </label>
            <button
              @click="removeTodo(todo.id)"
              style="background: transparent; border: none; color: #ef4444; font-size: 1.2rem; cursor: pointer; padding: 0.25rem 0.5rem; border-radius: 4px; transition: background 0.2s;"
              onmouseover="this.style.background='#fee2e2'" onmouseout="this.style.background='transparent'"
            >
              🗑️
            </button>
          </li>
        </ul>

        <p v-if="todos.length === 0" style="text-align: center; color: #94a3b8; margin-top: 2rem; font-style: italic;">
          할 일이 없습니다. 휴식을 취하세요!
        </p>
      </div>
    `
  }).mount('#app');
</script>
계산된 속성과 감시자 (computed & watch)
반응형 상태의 두 번째 마법: computed와 watch
반응형 상태(ref, reactive)를 선언했다면, 그 값이 변할 때 연쇄적으로 무언가를 처리해야 할 때가 있습니다.
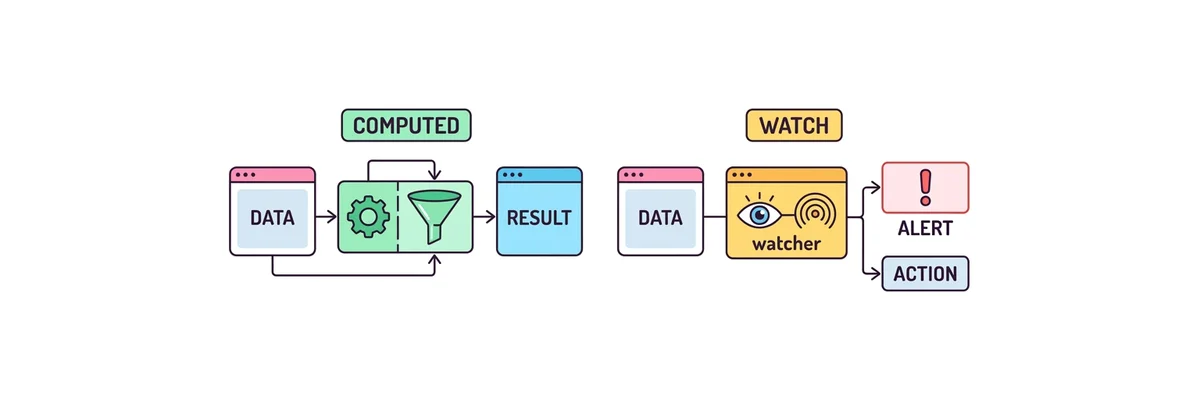
이때 두 가지 핵심 도구를 사용합니다. 기존 데이터를 입맛에 맞게 가공하여 파생된 데이터를 리턴(계산)하는 computed,
그리고 데이터가 변하는 순간을 감지하여 API 호출이나 알림 등 외부 작업(사이드 이펙트)을 실행하는 watch입니다.
| 비교 항목 | computed (계산된 속성) | watch (감시자) |
|---|---|---|
| 주 목적 | 원본 데이터를 가공하여 새로운 값을 반환 (UI 렌더링용) | 값이 변경될 때 발생하는 외부 작업 처리 (API 요청, 타이머 등) |
| 반환값 (return) | 필수적 (반드시 값을 return 해야 함) | 불필요 (실행 후 결과를 반환하지 않음) |
| 캐싱 (Caching) | 지원함 (원본 데이터가 안 바뀌면 캐싱된 결과 재사용) | 지원 안 함 (변할 때마다 무조건 실행) |
어떤 변수의 값이 변할 때, 그에 따라 자동으로 변하는 또 다른 파생된 값을 만들거나, 값이 변할 때마다 특정 동작(API 호출 등)을 실행하게 만들고 싶을 때가 있습니다. 이때 사용하는 핵심 도구가 바로 computed와 watch입니다.
<!-- HIDDEN_TAB -->
<div id="app"></div>
<script src="https://unpkg.com/vue@3/dist/vue.global.js"></script>
<script>
  const { createApp, ref, computed, watch } = Vue;
  createApp({
    setup() {
      const searchQuery = ref('');
      const items = ref(['🍎 사과', '🍌 바나나', '🍇 포도', '🍓 딸기', '🍉 수박']);
      const apiLogs = ref([]);
      const isSearching = ref(false);

      // 1. computed: 검색어에 따라 목록 필터링 (가공된 데이터 반환)
      const filteredItems = computed(() => {
        if (!searchQuery.value) return items.value;
        return items.value.filter(item => item.includes(searchQuery.value));
      });

      // 2. watch: 검색어가 바뀔 때마다 로그를 찍고 가짜 API 호출
      watch(searchQuery, (newValue, oldValue) => {
        isSearching.value = true;
        const time = new Date().toLocaleTimeString();
        const log = `[${time}] '${oldValue}' -> '${newValue}' 감지됨`;
        apiLogs.value.unshift(log);
        if (apiLogs.value.length > 5) apiLogs.value.pop();

        // API 호출 흉내내기
        setTimeout(() => {
          isSearching.value = false;
        }, 500);
      });

      return { searchQuery, filteredItems, apiLogs, isSearching };
    },
    template: `
      <div style="display:flex; gap:2rem; max-width: 800px; margin: 2rem auto; font-family: system-ui, sans-serif;">
        <!-- 왼쪽: computed 영역 -->
        <div style="flex: 1; padding: 2rem; border: 2px solid #10b981; border-radius: 12px; background: #ecfdf5;">
          <h2 style="color: #047857; font-size: 1.25rem; font-weight: 800; margin-bottom: 0.5rem; display: flex; align-items: center; gap: 8px;">
             ⚙️ computed (필터링)
          </h2>
          <p style="color: #065f46; font-size: 0.9rem; margin-bottom: 1rem;">원본 배열을 해치지 않고 새 배열 반환</p>

          <input
            v-model="searchQuery"
            placeholder="과일 이름을 검색해보세요..."
            style="width: 100%; box-sizing: border-box; padding: 0.75rem; margin-bottom: 1.5rem; border: 2px solid #34d399; border-radius: 8px; font-size: 1rem; outline: none;"
          />

          <ul style="list-style: none; padding: 0; margin: 0; display: grid; gap: 0.5rem;">
            <li
              v-for="(item, index) in filteredItems" :key="index"
              style="padding: 0.75rem; background: white; border: 1px solid #a7f3d0; border-radius: 6px; font-weight: bold; color: #064e3b;"
            >
              {{ item }}
            </li>
            <li v-if="filteredItems.length === 0" style="color: #059669; font-style: italic; text-align: center; padding: 1rem;">
              결과가 없습니다.
            </li>
          </ul>
        </div>

        <!-- 오른쪽: watch 영역 -->
        <div style="flex: 1; padding: 2rem; border: 2px solid #f59e0b; border-radius: 12px; background: #fffbeb;">
          <h2 style="color: #b45309; font-size: 1.25rem; font-weight: 800; margin-bottom: 0.5rem; display: flex; align-items: center; gap: 8px;">
             👁️ watch (사이드 이펙트)
             <span v-if="isSearching" style="font-size: 0.8rem; background: #ef4444; color: white; padding: 2px 8px; border-radius: 12px;">검색 API 호출중...</span>
          </h2>
          <p style="color: #92400e; font-size: 0.9rem; margin-bottom: 1rem;">변수가 변할 때마다 외부 동작 실행</p>

          <div style="background: #1e293b; color: #f8fafc; border-radius: 8px; padding: 1rem; font-family: monospace; font-size: 0.85rem; height: 200px; overflow-y: auto;">
            <div style="color: #94a3b8; margin-bottom: 0.5rem; border-bottom: 1px solid #334155; padding-bottom: 0.5rem;">Terminal Watch Logs...</div>
            <div v-for="(log, i) in apiLogs" :key="i" style="margin-bottom: 0.25rem; color: #fcd34d;">
              {{ log }}
            </div>
          </div>
        </div>
      </div>
    `
  }).mount('#app');
</script>
컴포넌트 통신 기초 (Props & Emit)
컴포넌트 통신의 핵심: Props와 Emit
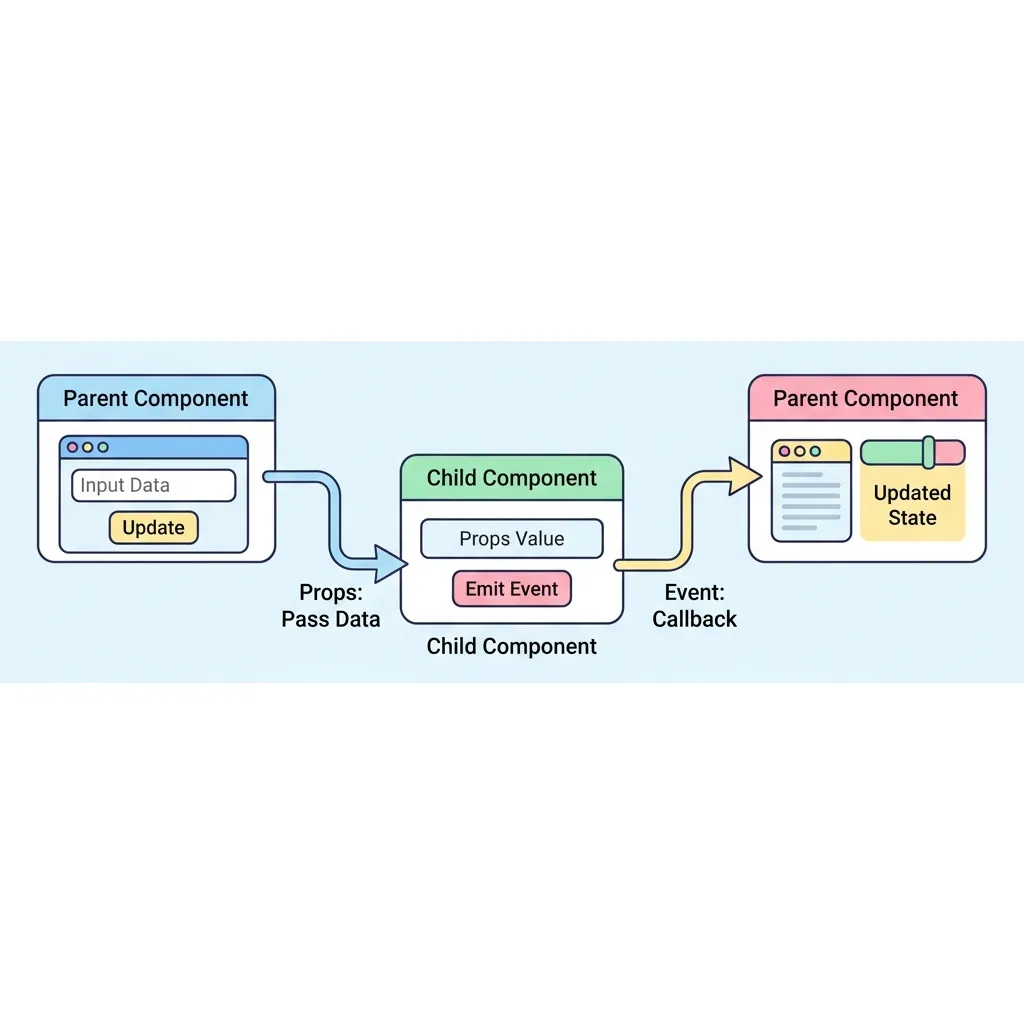
모던 프론트엔드는 작은 컴포넌트들을 조립하여 큰 애플리케이션을 완성합니다. 이때 컴포넌트들끼리 대화를 나누는 가장 기본적이고 중요한 규칙이 바로 단방향 데이터 흐름입니다.
부모는 자식에게 Props라는 택배 상자로 데이터를 내려보내고, 자식은 부모에게 Emit이라는 확성기로 이벤트를 올려보냅니다.
이 규칙을 철저히 지키면 앱이 커져도 데이터가 꼬이는 일(스파게티 코드)을 방지할 수 있습니다.
| 비교 항목 | Props (프롭스) | Emit (에밋) |
|---|---|---|
| 통신 방향 | 부모 ➡️ 자식 (위에서 아래로 전달) | 자식 ➡️ 부모 (아래에서 위로 전달) |
| 전달 내용 | 문자열, 숫자, 객체, 배열 등 실제 데이터 값 | 클릭, 완료 등 무언가 일어났다는 이벤트 신호 (+ 선택적 데이터) |
| 수정 가능 여부 | 읽기 전용 (Read-only). 자식이 값을 마음대로 수정하면 안 됩니다! | 이벤트를 받은 부모가 직접 자신의 상태(데이터)를 수정합니다. |
<!-- HIDDEN_TAB -->
<div id="app"></div>
<script src="https://unpkg.com/vue@3/dist/vue.global.js"></script>
<script>
const { createApp, ref } = Vue;
const app = createApp({
setup() {
// 부모 컴포넌트의 상태 (데이터)
const parentMsg = ref('우리 예쁜 딸, 용돈 5만원 💸');
const childResponse = ref('');
// 자식이 Emit으로 보내온 이벤트를 처리하는 함수
const handleReply = (msg) => {
childResponse.value = msg;
console.log('부모: 자식으로부터 응답을 받았습니다 ->', msg);
};
return { parentMsg, childResponse, handleReply };
},
template: `
<div style="padding: 2rem; max-width: 600px; margin: 2rem auto; font-family: system-ui;">
<div style="background: #eff6ff; border: 3px solid #3b82f6; border-radius: 16px; padding: 2rem; box-shadow: 0 10px 15px -3px rgba(0,0,0,0.1);">
<h2 style="color: #1d4ed8; margin-top: 0; display: flex; align-items: center; gap: 8px;">
👨👦 부모 컴포넌트
</h2>
<p style="color: #334155; margin-bottom: 0.5rem;">
<strong>자식에게 전달할 Props (용돈):</strong>
</p>
<input
v-model="parentMsg"
style="width: 100%; box-sizing: border-box; padding: 0.75rem; border: 2px solid #93c5fd; border-radius: 8px; font-size: 1rem; margin-bottom: 1.5rem;"
/>
<div v-if="childResponse" style="background: #fffbeb; border: 2px dashed #f59e0b; padding: 1rem; border-radius: 8px; margin-bottom: 1.5rem;">
<span style="color: #b45309; font-weight: bold;">📬 자식의 답장:</span>
<span style="color: #92400e; margin-left: 0.5rem;">{{ childResponse }}</span>
</div>
<!-- 자식 컴포넌트 렌더링 -->
<ChildComponent
:message="parentMsg"
@reply="handleReply"
/>
</div>
</div>
`
});
// 자식 컴포넌트를 정의합니다.
app.component('ChildComponent', {
// 부모로부터 받을 Props 선언
props: ['message'],
// 부모에게 보낼 Emit 이벤트 이름 선언
emits: ['reply'],
setup(props, { emit }) {
const sendReply = () => {
// 'reply'라는 이름의 이벤트를 발생시키고, 두 번째 인자로 데이터를 담아 보냅니다.
emit('reply', '고맙습니다! 아껴서 잘 쓸게요 😍');
};
return { sendReply };
},
template: `
<div style="background: #fdf2f8; border: 3px solid #ec4899; border-radius: 12px; padding: 1.5rem; position: relative;">
<div style="position: absolute; top: -15px; left: 50%; transform: translateX(-50%); background: white; padding: 2px 12px; border-radius: 99px; border: 1px solid #cbd5e1; color: #64748b; font-size: 0.8rem;">
⬇️ 데이터 흐름 (Props) ⬇️
</div>
<h3 style="color: #be185d; margin-top: 0.5rem; display: flex; align-items: center; gap: 8px;">
👧 자식 컴포넌트
</h3>
<p style="color: #334155; margin-bottom: 1.5rem; background: white; padding: 1rem; border-radius: 8px; border: 1px solid #fbcfe8;">
부모님 말씀: <strong style="color: #ec4899;">{{ message }}</strong>
</p>
<button
@click="sendReply"
style="width: 100%; background: #ec4899; color: white; padding: 0.75rem 1rem; border: none; border-radius: 8px; font-weight: bold; cursor: pointer; transition: background 0.2s;"
onmouseover="this.style.background='#db2777'" onmouseout="this.style.background='#ec4899'"
>
⬆️ 부모님께 감사 인사 보내기 (Emit)
</button>
</div>
`
});
app.mount('#app');
</script>컴포넌트 심화: 슬롯(Slots)과 Provide/Inject
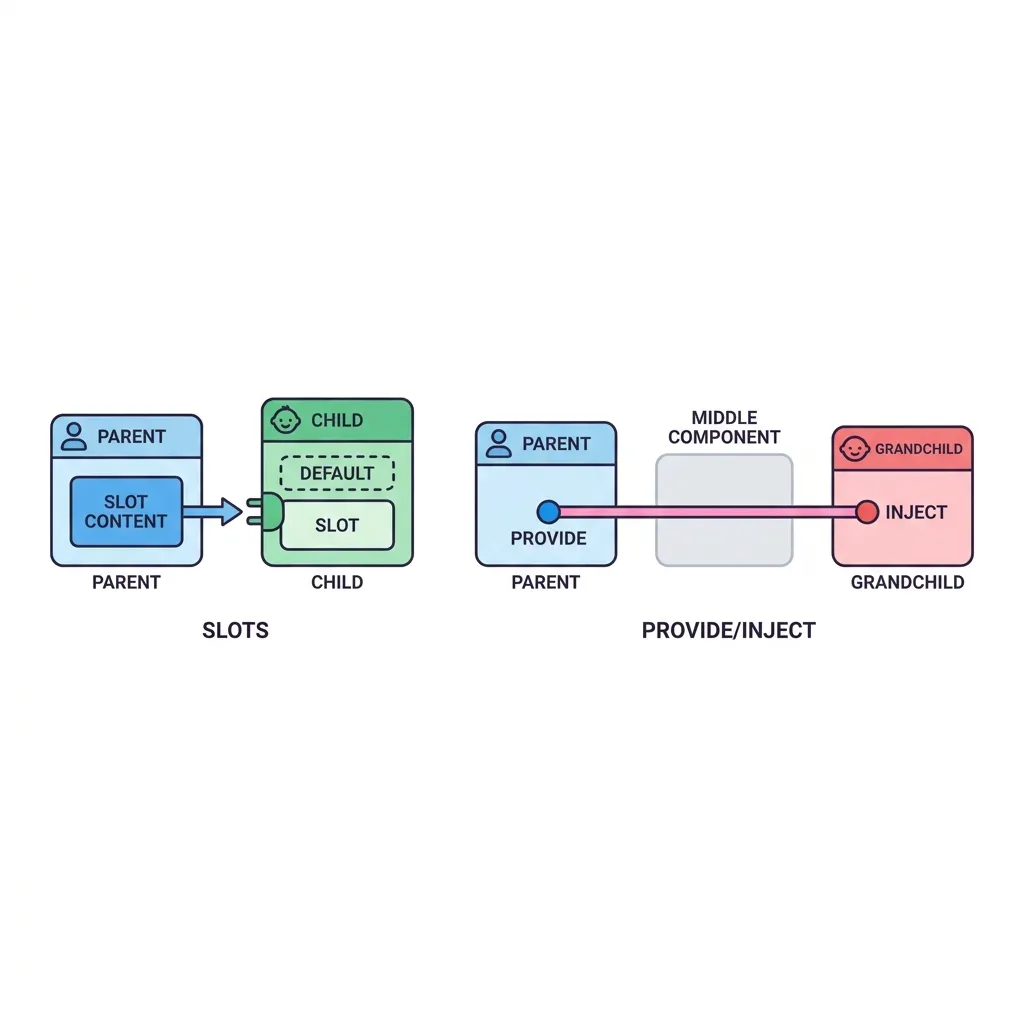
컴포넌트 심화: 슬롯(Slots)과 Provide/Inject
Props와 Emit만으로 모든 것을 해결하려다 보면 문제가 생깁니다. 부모가 자식의 내부 디자인(HTML)을 통째로 갈아 끼우고 싶거나, 할아버지 컴포넌트가 저 아래 까마득한 손자 컴포넌트에게 데이터를 주고 싶을 때는 어떻게 할까요? 이때 Slots와 Provide/Inject가 등장합니다.
<!-- HIDDEN_TAB -->
<div id="app"></div>
<script src="https://unpkg.com/vue@3/dist/vue.global.js"></script>

<script>
  const { createApp, ref, provide, inject, defineComponent } = Vue;

  const GrandChild = defineComponent({
    template: `
      <div :class="theme === 'dark' ? 'bg-black' : 'bg-white'">
        🎉 현재 주입받은 테마는 <strong>{{ theme }}</strong> 입니다!
      </div>
    `,
    setup() {
      const theme = inject('theme');
      return { theme };
    }
  });

  const Modal = defineComponent({
    template: `
      <div class="modal-container">
        <div class="modal-header">
          <slot name="header"></slot>
        </div>
        <div class="modal-body">
          <slot></slot>
        </div>
        <div class="modal-footer">
          <slot name="footer"></slot>
        </div>
      </div>
    `
  });

  const App = defineComponent({
    components: { GrandChild, Modal },
    template: `
      <div class="max-w-lg p-8 bg-gray-50">
        <h2 style="margin-top:0; color: #38bdf8;">1. Provide / Inject 테스트</h2>
        <GrandChild />

        <h2 style="color: #a78bfa;">2. Named Slots 테스트</h2>
        <Modal>
          <template #header>
            <h1 class="text-2xl text-red-600">🚨 경고: 결제 실패</h1>
          </template>

          <p class="text-gray-700 my-4">잔액이 부족하여 결제가 취소되었습니다.</p>

          <template #footer>
            <button class="btn-close" @click="closeModal">확인 및 닫기</button>
          </template>
        </Modal>
      </div>
    `,
    setup() {
      const themeColor = ref('dark');
      provide('theme', themeColor);

      const closeModal = () => {
        alert("모달이 닫혔습니다!");
      };

      return { closeModal };
    }
  });

  createApp(App).mount('#app');
</script>
Vue Router를 활용한 라우팅 (SPA 구축)
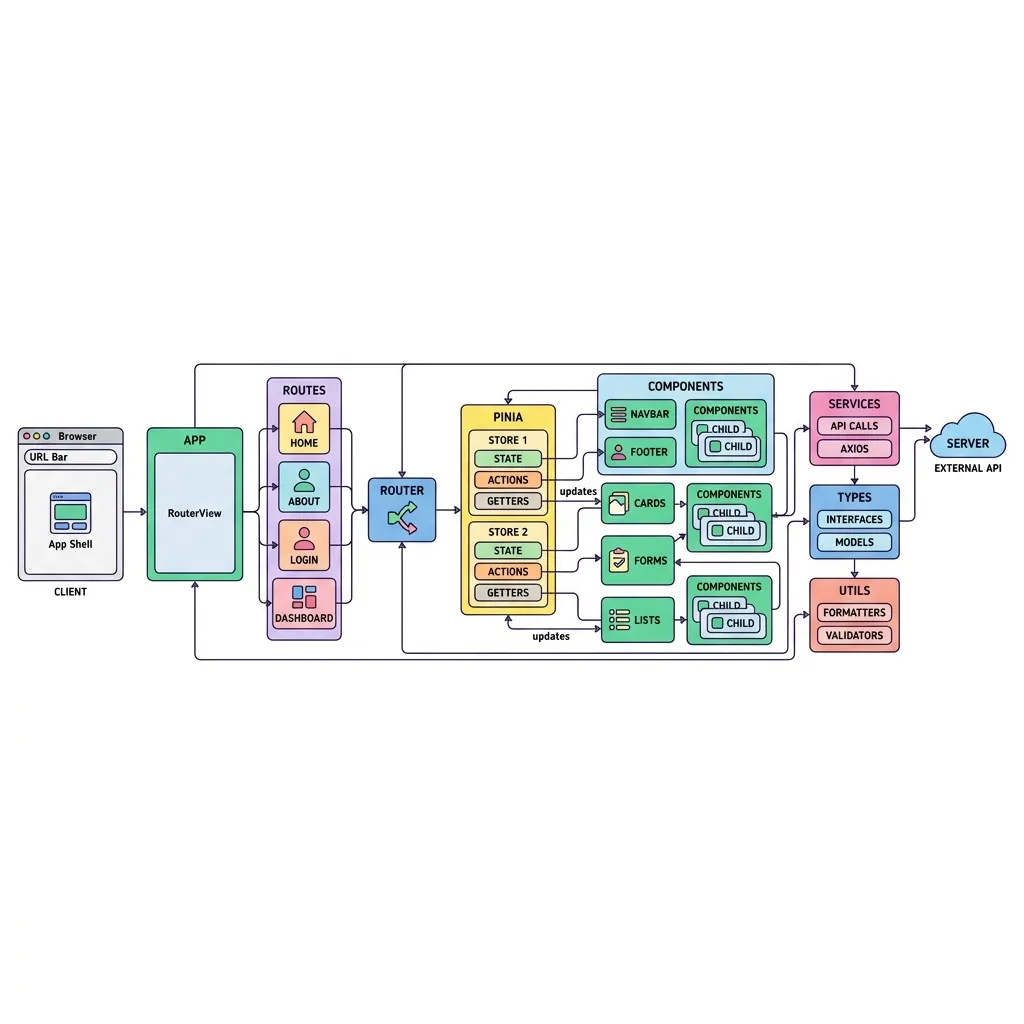
Vue Router를 활용한 라우팅 (SPA 구축)
여러 페이지를 가진 웹사이트처럼 보이지만, 실제로는 단 하나의 HTML 파일에서 자바스크립트로 화면만 갈아 끼우는 방식을 SPA(Single Page Application)라고 합니다. Vue에서 이를 완벽하게 구현해 주는 공식 도구가 바로 Vue Router입니다.
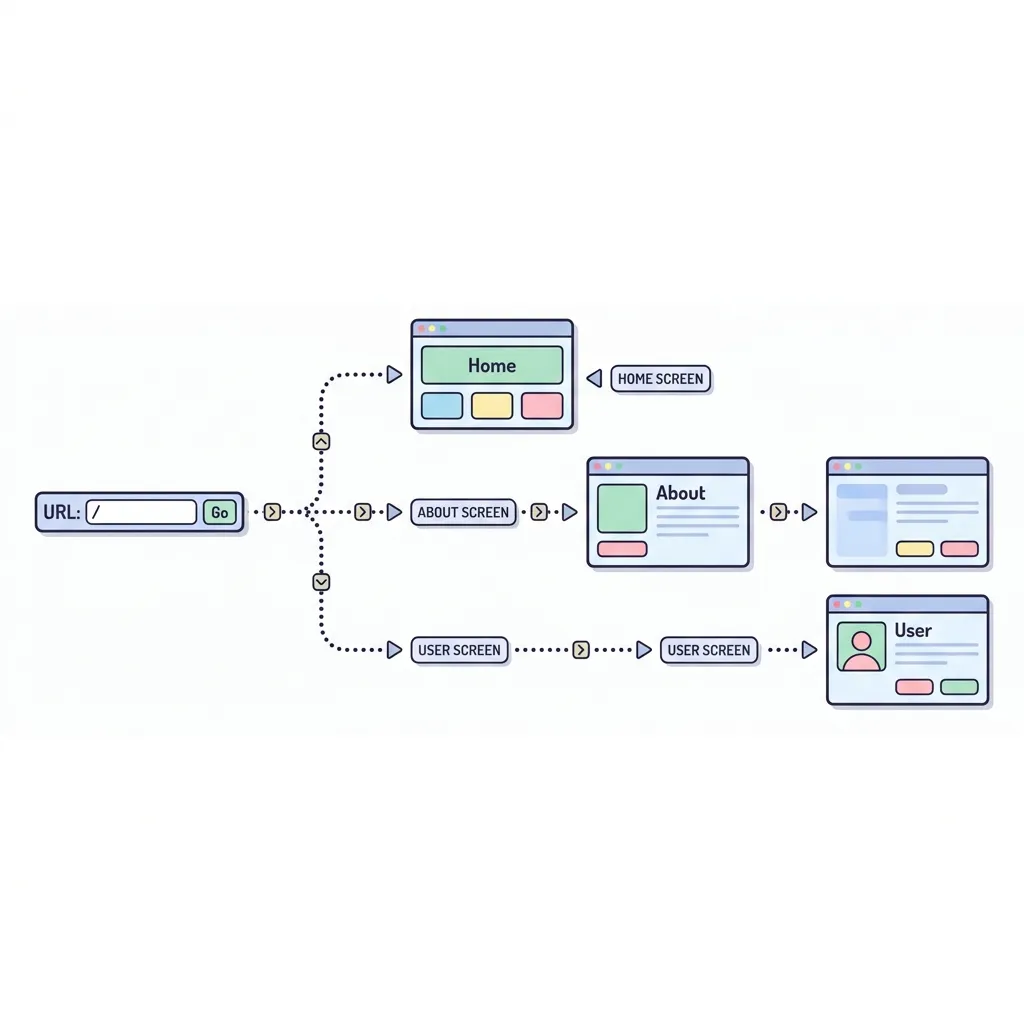
💡 핵심 포인트: 일반적인 웹사이트는 링크를 누르면 화면 전체가 하얗게 깜빡이며 새로고침 되지만, Vue Router를 사용하면 브라우저 주소창만 바뀌고 필요한 컴포넌트 조각만 부드럽게 교체되어 네이티브 앱 같은 쾌적한 속도를 냅니다.
<!-- HIDDEN_TAB -->
<div id="app"></div>
<script src="https://unpkg.com/vue@3/dist/vue.global.js"></script>
<script src="https://unpkg.com/vue-router@4"></script>

<script>
  const { createApp, ref, defineComponent } = Vue;
  const { createRouter, createMemoryHistory, useRoute } = VueRouter;

  const HomeView = defineComponent({
    template: `
      <div>
        <h1 class="text-2xl">홈페이지 🏠</h1>
        <p class="text-lg mt-4">여기는 메인 화면입니다. 상단 네비게이션을 클릭해 보세요!</p>
      </div>
    `
  });

  const UserView = defineComponent({
    template: `
      <div>
        <h1 class="text-2xl">회원 정보 상세 페이지 👤</h1>
        <p class="text-lg mt-4">
          조회하신 회원님의 번호는 <strong class="text-red-500">{{ route.params.id }}</strong>번 입니다.
        </p>
      </div>
    `,
    setup() {
      const route = useRoute();
      return { route };
    }
  });

  // CodePen/Iframe 환경에서는 URL을 건드리지 않는 createMemoryHistory 사용
  const router = createRouter({
    history: createMemoryHistory(),
    routes: [
      { path: '/', name: 'home', component: HomeView },
      { path: '/user/:id', name: 'user', component: UserView }
    ]
  });

  // MemoryHistory는 초기 경로를 설정해 주어야 합니다.
  router.push('/');

  const App = defineComponent({
    template: `
      <div class="max-w-2xl">
        <nav class="nav-menu">
          <router-link to="/" class="nav-link">홈으로</router-link>
          <router-link to="/user/777" class="nav-link">내 정보(777)</router-link>
          <router-link to="/user/admin" class="nav-link text-red-500">관리자</router-link>
        </nav>
        <main class="main-content">
          <router-view />
        </main>
      </div>
    `
  });

  const app = createApp(App);
  app.use(router);
  app.mount('#app');
</script>
Pinia를 활용한 전역 상태 관리
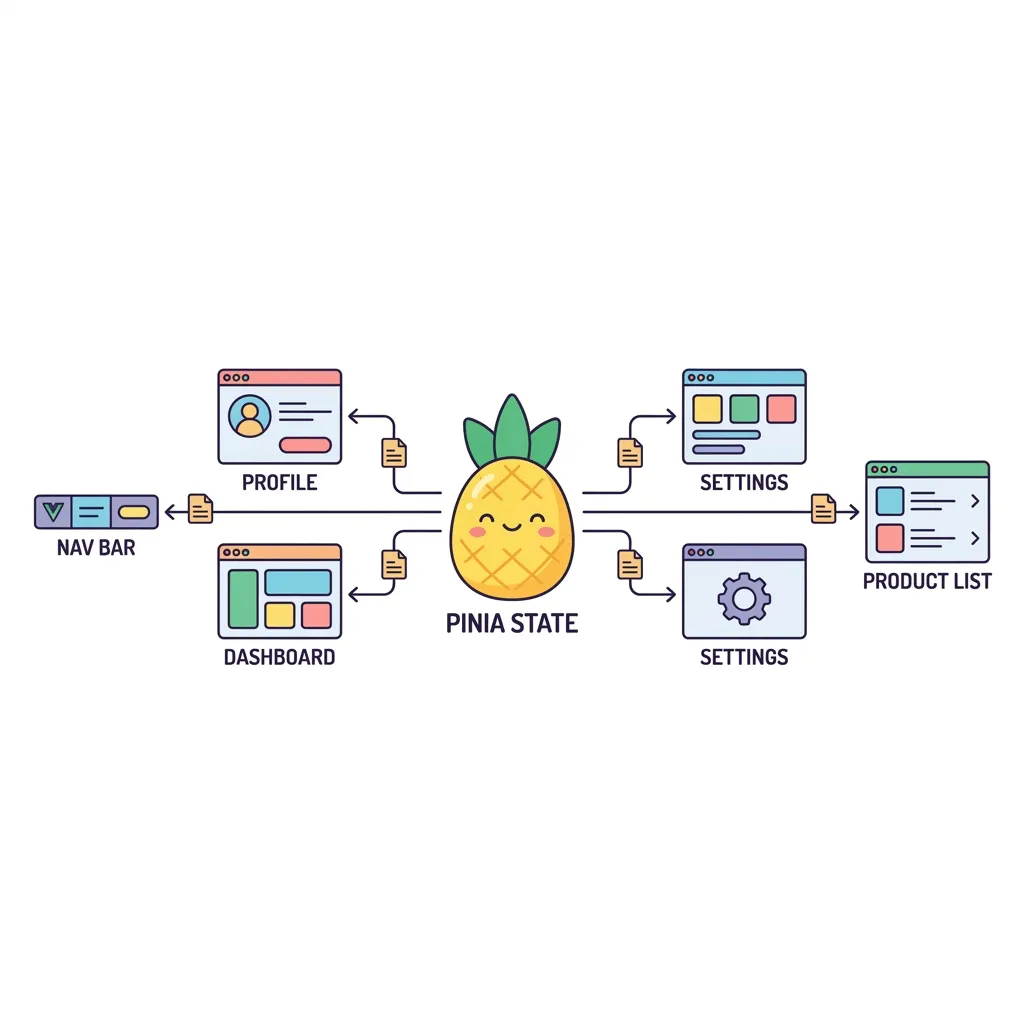
Pinia를 활용한 전역 상태 관리
컴포넌트 개수가 10개, 20개로 늘어나고 깊이가 깊어지면 Props와 Emit만으로 데이터를 주고받기엔 한계가 옵니다. 이때, 모든 컴포넌트가 언제든 꺼내 쓸 수 있는 공용 데이터 창고(전역 상태 관리)가 필요한데, Vue 3의 공식 표준 창고가 바로 Pinia(피니아)입니다. (과거 Vuex를 대체합니다.)
<!-- HIDDEN_TAB -->
<div id="app"></div>
<script src="https://unpkg.com/vue@3/dist/vue.global.js"></script>
<script src="https://unpkg.com/vue-demi"></script>
<script src="https://unpkg.com/pinia"></script>

<script>
  const { createApp, ref, computed, defineComponent } = Vue;
  const { createPinia, defineStore } = Pinia;

  // Store 정의
  const useCounterStore = defineStore('counter', () => {
    const count = ref(0);
    const doubleCount = computed(() => count.value * 2);
    function increment() {
      count.value++;
    }
    return { count, doubleCount, increment };
  });

  const ComponentA = defineComponent({
    template: `
      <div class="p-6 bg-purple-50 rounded-lg border-2 border-purple-200 text-center">
        <h2 class="text-xl font-bold text-purple-700">컴포넌트 A</h2>
        <p class="text-3xl my-4">카운트: {{ store.count }}</p>
        <button @click="store.increment" class="bg-purple-600 text-white px-6 py-2 rounded-full font-bold shadow hover:bg-purple-700 cursor-pointer">
          +1 증가시키기
        </button>
      </div>
    `,
    setup() {
      const store = useCounterStore();
      return { store };
    }
  });

  const ComponentB = defineComponent({
    template: `
      <div class="p-6 bg-purple-50 rounded-lg border-2 border-purple-200 text-center" style="border-color: #4ade80;">
        <h2 class="text-xl font-bold" style="color: #4ade80;">컴포넌트 B</h2>
        <p class="text-3xl my-4">카운트: {{ store.count }}</p>
        <p class="text-gray-500 mb-4">2배 곱한 값: {{ store.doubleCount }}</p>
      </div>
    `,
    setup() {
      const store = useCounterStore();
      return { store };
    }
  });

  const App = defineComponent({
    components: { ComponentA, ComponentB },
    template: `
      <div>
        <h2 style="margin-top:0;">Pinia 전역 상태 관리</h2>
        <p style="color: #cbd5e1; margin-bottom: 20px;">Component A에서 버튼을 누르면, 서로 전혀 관련 없는 Component B의 화면도 동시에 업데이트됩니다!</p>
        <div class="grid-2">
          <ComponentA />
          <ComponentB />
        </div>
      </div>
    `
  });

  const app = createApp(App);
  app.use(createPinia());
  app.mount('#app');
</script>
컴포저블(Composables) 함수로 로직 재사용하기
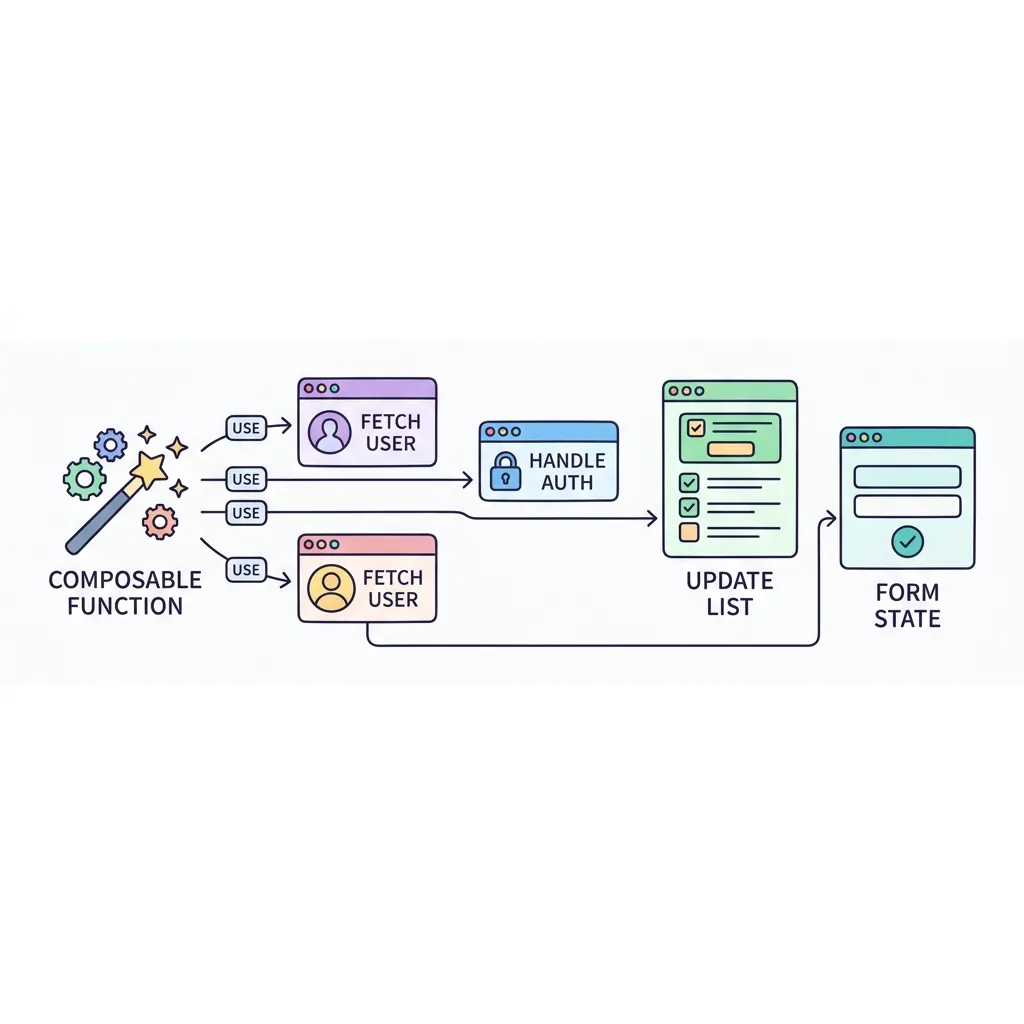
컴포저블(Composables) 함수로 로직 재사용하기
여러 컴포넌트에서 완전히 똑같은 기능(예: 마우스 커서 위치 추적, 다크 모드 토글, API 데이터 패칭)을 작성하고 있다면 어떨까요? Vue 3에서는 이 중복된 기능(상태+로직)을 싹둑 잘라내어 별도의 함수로 빼낼 수 있습니다. 이를 컴포저블(Composables)이라고 부르며, 관례적으로 use...() 라는 이름으로 시작합니다.
<!-- HIDDEN_TAB -->
<div id="app"></div>
<script src="https://unpkg.com/vue@3/dist/vue.global.js"></script>

<script>
  const { createApp, ref, onMounted, onUnmounted, defineComponent } = Vue;

  // 📂 composables/useMouse.js 모방
  function useMouse() {
    const x = ref(0);
    const y = ref(0);
    function update(event) {
      x.value = event.pageX;
      y.value = event.pageY;
    }
    onMounted(() => window.addEventListener('mousemove', update));
    onUnmounted(() => window.removeEventListener('mousemove', update));
    return { x, y };
  }

  const App = defineComponent({
    template: `
      <div class="h-screen w-full flex items-center justify-center bg-teal-50">
        <div class="text-center">
          <h1 class="text-3xl font-bold text-teal-800 mb-4">마우스를 움직여보세요!</h1>
          <p class="text-4xl font-mono text-teal-600 bg-white p-4 rounded-xl shadow-lg border border-teal-200">
            X: {{ x }} / Y: {{ y }}
          </p>
        </div>
      </div>
    `,
    setup() {
      const { x, y } = useMouse();
      return { x, y };
    }
  });

  createApp(App).mount('#app');
</script>
내장 컴포넌트 마스터하기: 생명주기와 Teleport, Suspense
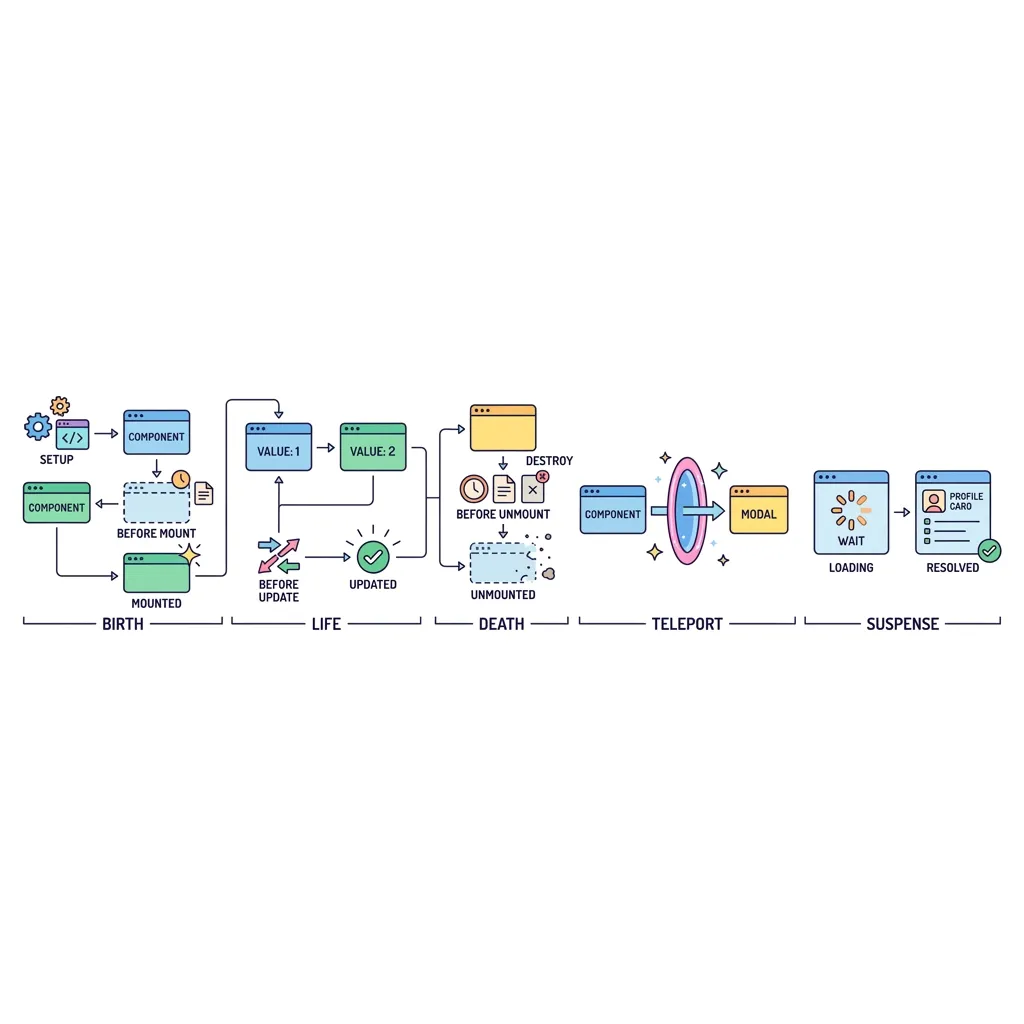
내장 컴포넌트 마스터하기: 생명주기와 Teleport, Suspense
Vue 컴포넌트는 태어나고(Mount) 사라지는(Unmount) 생명주기(Lifecycle)를 가집니다. 이를 조작하여 컴포넌트가 뜰 때 백엔드 API를 호출할 수 있습니다. 추가로, Vue 3에서 제공하는 마법 같은 내장 컴포넌트인 <Teleport>를 사용하면, 복잡하게 중첩된 HTML 구조 속에서도 모달창이나 팝업을 화면 최상단(body)으로 순간이동 시켜 Z-Index 버그를 영구적으로 없앨 수 있습니다.
<!-- HIDDEN_TAB -->
<div id="app"></div>
<script src="https://unpkg.com/vue@3/dist/vue.global.js"></script>

<script>
  const { createApp, ref, onMounted, defineComponent } = Vue;

  const App = defineComponent({
    template: `
      <div class="p-8">
        <h1 class="text-3xl font-bold mb-6">마이페이지 대시보드</h1>

        <div v-if="isLoading" class="text-gray-500 animate-pulse">
          데이터를 불러오는 중입니다...
        </div>

        <div v-else class="space-y-4">
          <p class="text-xl">환영합니다, <span class="font-bold text-blue-600" style="color:#60a5fa;">{{ userData.name }}</span> 님!</p>
          <button @click="isModalOpen = true" class="bg-red-500 font-bold">
            탈퇴 경고문 열기
          </button>
        </div>

        <Teleport to="body">
          <div v-if="isModalOpen" class="fixed inset-0 bg-black flex items-center justify-center z-50">
            <div class="bg-white p-8 rounded-xl shadow-2xl max-w-sm text-center">
              <h2 class="text-2xl font-bold mb-4">정말 탈퇴하시겠습니까?</h2>
              <p class="text-gray-500 mb-8">모든 정보가 삭제되며 복구할 수 없습니다.</p>

              <div class="flex gap-4 justify-center">
                <button @click="isModalOpen = false" class="px-4 py-2 bg-gray-200 rounded">취소</button>
                <button class="px-4 py-2 bg-red-600 rounded text-white font-bold" @click="isModalOpen = false; alert('탈퇴 처리되었습니다.')">탈퇴</button>
              </div>
            </div>
          </div>
        </Teleport>
      </div>
    `,
    setup() {
      const isModalOpen = ref(false);
      const userData = ref(null);
      const isLoading = ref(true);

      onMounted(async () => {
        try {
          const response = await fetch('https://jsonplaceholder.typicode.com/users/1');
          userData.value = await response.json();
        } catch (e) {
          console.error("데이터 통신 에러!");
        } finally {
          isLoading.value = false;
        }
      });

      return { isModalOpen, userData, isLoading };
    }
  });

  createApp(App).mount('#app');
</script>
비동기 컴포넌트(Async Components)와 성능 최적화
비동기 컴포넌트(Async Components)와 성능 최적화
대규모 애플리케이션에서는 모든 컴포넌트를 한 번에 불러오면 초기 로딩 속도가 느려집니다. defineAsyncComponent를 활용한 코드 스플리팅 기법과 v-memo, shallowRef 등을 이용한 렌더링 최적화 전략을 다룹니다.

코드 스플리팅(Code Splitting)의 마법
우리가 웹 브라우저로 사이트에 접속할 때, 브라우저는 자바스크립트 파일을 다운로드합니다. 모든 컴포넌트가 하나의 거대한 app.js 파일에 뭉쳐 있다면(Bundle), 사용자는 당장 필요하지 않은 관리자용 페이지나 무거운 차트 라이브러리까지 모두 다운로드될 때까지 하얀 화면만 보게 됩니다. defineAsyncComponent는 이런 거대한 덩어리를 잘게 쪼개어(Code Splitting), "필요한 순간에만 해당 파일을 받아오게" 만드는 훌륭한 최적화 기술입니다.
| 방식 | 코드 작성법 | 특징 및 사용처 |
|---|---|---|
| 정적 Import (동기) | import Header from './Header.vue' | 앱이 시작될 때 무조건 로딩. 헤더, 푸터, 메인 네비게이션 등 즉시 렌더링되어야 하는 필수 요소에 사용. |
| 동적 Import (비동기) | defineAsyncComponent(() => import('./Heavy.vue')) | 해당 컴포넌트가 화면에 나타날 때(v-if 등) 다운로드. 모달(Modal), 복잡한 차트, 에디터, 잘 안 가는 라우터 페이지에 사용. |
⚠️ 주의: 과유불급! 모든 걸 비동기로 만들지는 마세요!
단순한 버튼 하나, 작은 텍스트 블록까지 비동기 컴포넌트로 만들면, 브라우저가 수백 개의 자잘한 파일을 다운로드하기 위해 수백 번의 네트워크 요청을 보내야 하므로 오히려 성능이 심각하게 저하됩니다. 비동기 컴포넌트는 오직 '크기가 크고, 초기 화면에 필요하지 않은 덩어리'를 격리할 때만 사용하는 것이 올바른 최적화 전략입니다.
<!-- HIDDEN_TAB -->
<div id="app"></div>
<script src="https://unpkg.com/vue@3/dist/vue.global.js"></script>

<script>
  const { createApp, ref, defineAsyncComponent } = Vue;

  // 서버에서 아주 무거운 파일을 받아오는 상황을 시뮬레이션
  const loadHeavyChart = () => {
    return new Promise((resolve) => {
      console.log("네트워크: 대용량 컴포넌트 다운로드 시작... (2초 소요)");
      setTimeout(() => {
        console.log("네트워크: 다운로드 완료!");
        resolve({
          template: '<div class="chart-box">📊 대규모 데이터 차트 렌더링 완료! (15MB)</div>'
        });
      }, 2000);
    });
  };

  const AsyncHeavyChart = defineAsyncComponent({
    loader: loadHeavyChart,
    // 로딩 중일 때 보여줄 임시 컴포넌트
    loadingComponent: {
      template: '<div class="loading-box">⏳ 열심히 다운로드 중입니다... 잠시만 기다려주세요!</div>'
    },
    delay: 200 // 0.2초 이상 지연될 때만 로딩 컴포넌트 표시
  });

  const App = {
    components: { AsyncHeavyChart },
    template: `
      <div class="card">
        <h2>성능 최적화: 비동기 컴포넌트</h2>
        <p style="color: #94a3b8; margin-bottom: 20px;">
          버튼을 누르기 전까지는 무거운 차트 컴포넌트를 로드하지 않습니다.<br/>
          (F12 개발자 도구의 Network 탭 효과를 콘솔에서 확인하세요!)
        </p>

        <button class="btn" @click="showChart = true" v-if="!showChart">
          무거운 차트 컴포넌트 로드하기
        </button>

        <!-- 사용자가 버튼을 클릭하면 그때서야 비동기 컴포넌트가 마운트(다운로드)를 시작합니다. -->
        <AsyncHeavyChart v-if="showChart" />
      </div>
    `,
    setup() {
      const showChart = ref(false);
      return { showChart };
    }
  };

  createApp(App).mount('#app');
</script>
Transition과 애니메이션 완벽 가이드
Transition과 애니메이션 완벽 가이드
웹 애플리케이션의 사용자 경험(UX)을 극대화하기 위해 Vue가 제공하는 <Transition>과 <TransitionGroup> 컴포넌트의 활용법을 다룹니다. 진입/진출 트랜지션부터 리스트 애니메이션까지 시각적 피드백을 구현해 봅니다.
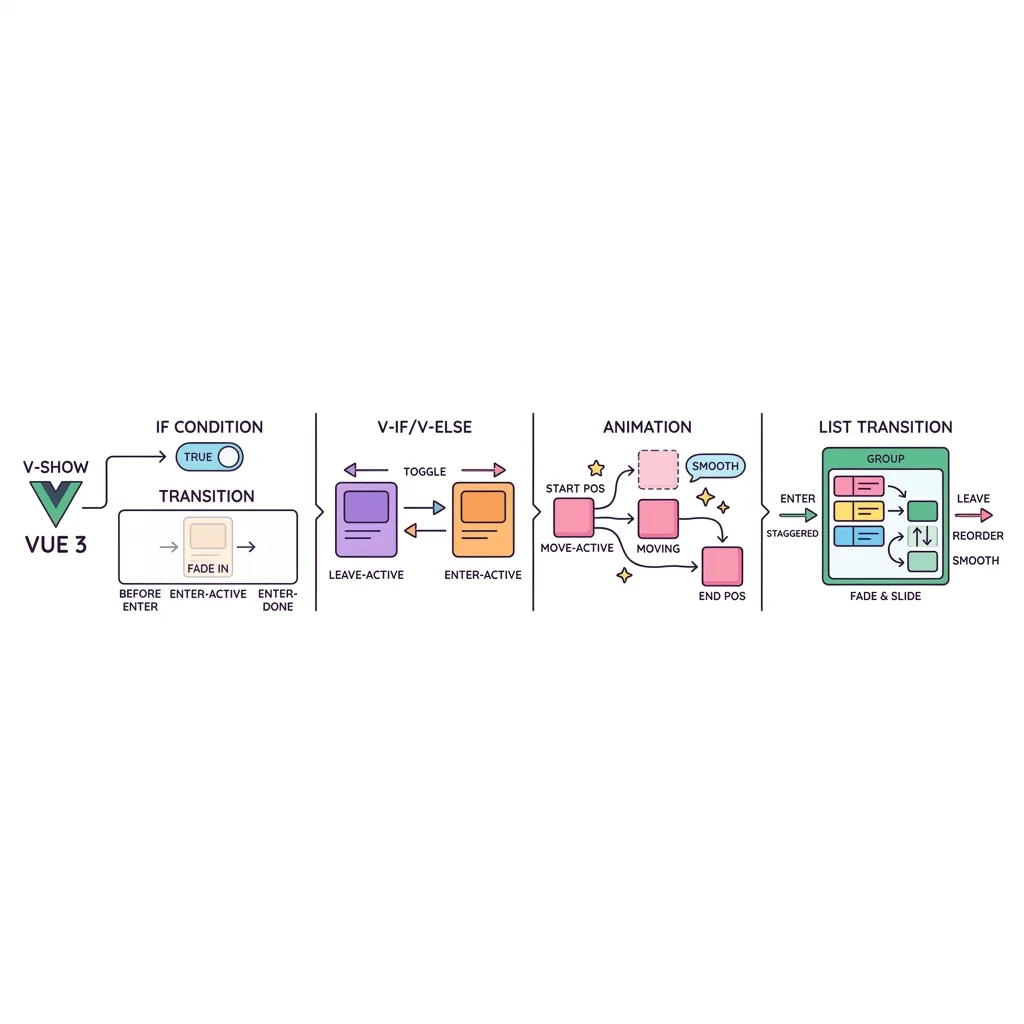
Vue Transition의 6가지 클래스 생명주기
Vue는 엘리먼트가 DOM에 추가(Enter)되거나 제거(Leave)될 때, 특정 시점마다 자동으로 CSS 클래스를 붙이고 떼어냅니다. 개발자는 이 클래스들에 CSS 애니메이션만 작성해주면 아주 부드러운 시각적 효과를 만들어낼 수 있습니다.
| 컴포넌트 이름 | 주요 특징 및 사용처 | Mode 설정 옵션 |
|---|---|---|
| <Transition> | 단일 요소나 컴포넌트(v-if, v-show, 동적 컴포넌트)의 진입/진출을 관리. | mode="out-in" (이전 요소가 나간 후 새 요소 등장) |
| <TransitionGroup> | v-for로 렌더링되는 다중 아이템 목록 관리에 사용. 엘리먼트가 움직일 때 v-move 클래스가 자동으로 붙음. |
tag="ul" (어떤 부모 태그로 렌더링할지 지정) |
💡 꿀팁: Transition 이름 지정하기
단순히 <Transition>만 사용하면 기본 접두사는 v-가 됩니다 (예: v-enter-active). 하지만 <Transition name="fade">처럼 이름을 지정해주면, 클래스 접두사가 해당 이름으로 바뀝니다 (예: fade-enter-active). 이를 통해 한 페이지 안에서 팝업용, 슬라이드용, 페이드용 등 다양한 애니메이션 클래스를 독립적으로 설계할 수 있습니다!
<!-- HIDDEN_TAB -->
<div id="app"></div>
<script src="https://unpkg.com/vue@3/dist/vue.global.js"></script>

<script>
  const { createApp, ref } = Vue;

  const App = {
    template: `
      <div>
        <h2 style="margin-top: 0;">Transition & TransitionGroup</h2>
        <div class="container">

          <!-- 1번 패널: 단일 Transition (Fade) -->
          <div class="panel">
            <h3 style="margin-top: 0; color: #38bdf8;">1. 단일 Transition</h3>
            <button class="btn" @click="showModal = !showModal">
              모달 {{ showModal ? '닫기' : '열기' }}
            </button>

            <Transition name="fade">
              <div v-if="showModal" class="modal-box">
                부드럽게 나타나고 사라지는<br/> 페이드 모달입니다! ✨
              </div>
            </Transition>
          </div>

          <!-- 2번 패널: 리스트 TransitionGroup (Slide) -->
          <div class="panel">
            <h3 style="margin-top: 0; color: #a78bfa;">2. TransitionGroup</h3>
            <button class="btn" @click="addItem">항목 추가</button>

            <TransitionGroup name="list" tag="ul" class="todo-list">
              <li v-for="item in items" :key="item.id" class="todo-item">
                {{ item.text }}
                <button class="btn btn-danger" style="margin-bottom: 0; padding: 4px 8px; font-size: 0.8rem;" @click="removeItem(item.id)">삭제</button>
              </li>
            </TransitionGroup>
          </div>

        </div>
      </div>
    `,
    setup() {
      // 1번: 단일 Transition 상태
      const showModal = ref(true);

      // 2번: TransitionGroup 상태
      const items = ref([
        { id: 1, text: 'Vue 3 공부하기' },
        { id: 2, text: 'Transition 클래스 외우기' },
        { id: 3, text: 'Minstudio에서 실습하기' }
      ]);
      let nextId = 4;

      const addItem = () => {
        // 배열 임의 위치에 추가하여 부드럽게 밀리는(.list-move) 효과 확인
        const randomIndex = Math.floor(Math.random() * (items.value.length + 1));
        items.value.splice(randomIndex, 0, { id: nextId++, text: '새로운 항목 ' + nextId });
      };

      const removeItem = (id) => {
        items.value = items.value.filter(item => item.id !== id);
      };

      return { showModal, items, addItem, removeItem };
    }
  };

  createApp(App).mount('#app');
</script>
커스텀 v-model과 다중 바인딩 심화
커스텀 v-model과 다중 바인딩 심화
Vue 3에서 가장 큰 변화 중 하나는 컴포넌트에 여러 개의 v-model을 동시에 사용할 수 있게 되었다는 점입니다. 이 강의에서는 modelValue와 update:modelValue를 활용하여 양방향 데이터 바인딩 컴포넌트를 설계하는 방법을 배웁니다.
왜 커스텀 v-model이 필요할까요?
기본적인 <input> 태그에는 v-model을 쉽게 사용할 수 있지만, 우리가 직접 만든 커스텀 입력 컴포넌트(예: 커스텀 드롭다운, 태그 입력기, 복합 폼)에서도 v-model을 사용하고 싶을 때가 있습니다. Vue 3에서는 이 과정이 매우 직관적이고 강력해졌습니다.
| 버전 | 동작 방식 | 한계 및 특징 |
|---|---|---|
| Vue 2 | value prop + input emit | 하나의 컴포넌트당 1개의 v-model만 허용됨. (.sync 수식어 혼용) |
| Vue 3 | modelValue prop + update:modelValue emit | 다중 v-model 바인딩 가능 (예: v-model:title, v-model:content) |
💡 핵심 규칙: 자식 컴포넌트의 역할
자식 컴포넌트는 부모로부터 받은 Props 데이터를 절대 직접 수정해서는 안 됩니다. 대신, 값이 변경되어야 할 때 emit('update:프롭이름', 새로운값)을 호출하여 부모에게 값을 변경해달라고 요청(이벤트)해야 합니다. 부모는 이 이벤트를 받아 자신의 상태를 업데이트하고, 변경된 값이 다시 자식에게 내려오면서 양방향 바인딩이 완성됩니다.
<!-- HIDDEN_TAB -->
<div id="app"></div>
<script src="https://unpkg.com/vue@3/dist/vue.global.js"></script>

<script>
  const { createApp, ref, defineComponent } = Vue;

  const CustomForm = defineComponent({
    template: `
      <div class="form-container">
        <h3 style="margin-top:0;">📝 복합 게시글 입력 폼 (자식)</h3>

        <div class="input-group">
          <label>제목 (v-model:title)</label>
          <input
            type="text"
            :value="title"
            @input="updateTitle"
            placeholder="제목을 입력하세요"
          />
        </div>

        <div class="input-group">
          <label>내용 (v-model:content)</label>
          <textarea
            :value="content"
            @input="updateContent"
            rows="4"
            placeholder="내용을 입력하세요"
          ></textarea>
        </div>
      </div>
    `,
    props: ['title', 'content'],
    emits: ['update:title', 'update:content'],
    setup(props, { emit }) {
      const updateTitle = (e) => {
        const newValue = e.target.value;
        emit('update:title', newValue);
        console.log("자식 -> 부모: 제목 변경 요청 (", newValue, ")");
      };
      const updateContent = (e) => {
        const newValue = e.target.value;
        emit('update:content', newValue);
        console.log("자식 -> 부모: 내용 변경 요청 (", newValue, ")");
      };
      return { updateTitle, updateContent };
    }
  });

  const App = defineComponent({
    components: { CustomForm },
    template: `
      <div>
        <h2>게시판 작성 (부모)</h2>
        <CustomForm
          v-model:title="postTitle"
          v-model:content="postContent"
        />
        <div class="preview">
          <h4 style="margin-top: 0;">실시간 데이터 미리보기 (부모 상태)</h4>
          <p style="margin: 5px 0;"><strong>제목:</strong> {{ postTitle || '(없음)' }}</p>
          <p style="margin: 0;"><strong>내용:</strong> {{ postContent || '(없음)' }}</p>
        </div>
      </div>
    `,
    setup() {
      const postTitle = ref('Vue 3 다중 v-model 연습');
      const postContent = ref('정말 편리하네요!');
      return { postTitle, postContent };
    }
  });

  createApp(App).mount('#app');
</script>
Vue 3 소개와 Composition API의 혁신반응형 상태 관리 (ref vs reactive)템플릿 문법과 필수 디렉티브계산된 속성과 감시자 (computed & watch)컴포넌트 통신 기초 (Props & Emit)컴포넌트 심화: 슬롯(Slots)과 Provide/InjectVue Router를 활용한 라우팅 (SPA 구축)Pinia를 활용한 전역 상태 관리컴포저블(Composables) 함수로 로직 재사용하기내장 컴포넌트 마스터하기: 생명주기와 Teleport, Suspense비동기 컴포넌트(Async Components)와 성능 최적화Transition과 애니메이션 완벽 가이드커스텀 v-model과 다중 바인딩 심화